During my writing of an upcoming vector field visualization paper, I used CUDA for high performance computation (HPC). For those who don’t know, CUDA is a GPU computing toolkit made by NVIDIA, and it supports both Linux and Windows (so no macOS). Other than a few books, it is sparsely documented, with not a lot of tutorials; so I will dump some of my notes here, and hopefully, this will help bootstrapping your journey into the world of CUDA, whoever you may be.
Prerequisites
We will be setting up a CUDA project using CMake, because CMake + Ninja is the correct way. You may disagree and say that on a Windows machine, MSVC provides the best compatibility, but no. Visual Studio doesn’t provide proper CUDA syntax highlighting, and marks all kernel calls as syntax errors. Plus, Visual Studio completely recompiles the whole project every single time. With Ninja, the building is incremental, meaning it only recompile source codes you’ve touched, so that’s good.
My go-to choice of CUDA development would be VSCode + the C/C++ for Visual Studio Code plugin. You can also install the C/C++ Extension Pack directly, which comes with in-editor CMake support. It’s so weird that a plugin of VSCode has better functionality than the humongous VS, but here we are.
Next up, in order to use CUDA, we have to install CUDA. If you are using a Linux machine, you can check whether CUDA is successfully installed by typing nvidia-smi into your command prompt. If you are using Windows, just check if the CUDA Toolkit or something is in your Program Files folder. With CUDA, CMake, a working installation of MSVC, and ninja-build in place, it’s now time for us to bust out the terminal.
Using CMake With CUDA
If you are using Windows, you need to open the Developer Powershell (or command line). If you have Windows Terminal (wt) installed, it should already be there in the drop down list. If you don’t, you need to source the vcvarsall.bat yourself:
PS C:\Users\admin> . "C:\Program Files\Microsoft Visual Studio\2022\Community\VC\Auxillary\Build\vcvarsall.bat"
After that we can create the CMakeLists.txt file for our CUDA project:
cmake_minimum_required(VERSION 3.20.0)

project(CUDAProject CUDA CXX)

set(PROJECT_SRC main.cpp)
set_source_files_properties(${PROJECT_SRC} PROPERTIES LANGUAGE CUDA)

add_executable(cuda_executable ${PROJECT_SRC})
After that we just need to
mkdir build
cd build
cmake .. -G Ninja
ninja
And the build will commence. As the project grows, we will be needing to add more and more source codes into the executable. We can’t just put them into the add_executable CMake call, because we need to tell CMake to treat them as CUDA source files. Otherwise CMake will just compile these files using regular compiler instead of nvcc. We can, of course, use the .cu extension, but I don’t really think it matters. On top of that, vscode-cpptools doesn’t suport .cu and .cuh header/source switches.
Next up, we will cover things that I have repeatedly used while using CUDA.
Debug Macro
CUDA calls, especially kernel calls, will fail silently; it is up to us to check whether it has failed after each execution. And I have just the right macro for you. Add this to a common header file and wrap all CUDA calls in this error check:
#define CHECK_CUDA_ERROR(val) check_cuda_result((val), (#val), __FILE__, __LINE__)

template<typename T>
void check_cuda_result(T result, const char *const func, const char *const file, int line) {
    if (result) {
        std::cerr << "CUDA error at " << file << ":" << line << " with code=" << ((unsigned int) result) << ", " << cudaGetErrorString(result) << ", \"" << func << "\"?" << std::endl;
    }
}
After kernel execution, call
CHECK_CUDA_ERROR(cudaDeviceSynchronize());
to check for kernel call errors. This will help you greatly in your debugging endeavours.
CUDA Blocks
Next up, let’s talk about the primary reason to use CUDA: high performance parallel computation! You can learn more from the official CUDA C++ Prorgamming Guide, but for those who just want to get started, let’s first take a look at an example.
Given two vectors a and b (\(a = \begin{bmatrix} a_1 \\ a_2 \\ ... \\ a_n \end{bmatrix}, b = \begin{bmatrix} b_1 \\ b_2 \\ ... \\ b_n \end{bmatrix}\)), if we are to add them up, traditionally, here’s what we need to do:
for (unsigned int i = 0; i < n; i++)
{
    c[i] = a[i] + b[1];
}
However, as n goes up, this becomes slower and slower. we can certainly parallelize this using threads, but CPUs can only do so much. This is where CUDA shines the most. Even an NVIDIA GeForce GTX 1060 has 1280 CUDA cores, which is way more than the number of average CPU cores. So how do we use it?
Step 1. Copy Data From Host to Device
First, we need to upload data to our GPU. In this example, we achieve this by generating a bunch of random numbers, allocating GPU memory using cudaMalloc, then copy memory from host (CPU) to device (GPU) using cudaMemcpy.
constexpr unsigned int N = 100;
std::uniform_int_distribution<int> distrib(1, 10);
std::random_device dev;

int a[N], b[N], c[N] = { 0 };
for (unsigned int i = 0; i < N; i++)
{
    a[i] = distrib(dev);
    b[i] = distrib(dev);
}

int *a_cuda, *b_cuda, *c_cuda;
CHECK_CUDA_ERROR(cudaMalloc(&a_cuda, sizeof(a)));
CHECK_CUDA_ERROR(cudaMalloc(&b_cuda, sizeof(b)));
CHECK_CUDA_ERROR(cudaMalloc(&c_cuda, sizeof(c)));
CHECK_CUDA_ERROR(cudaMemcpy(a_cuda, a, sizeof(a), cudaMemcpyHostToDevice));
CHECK_CUDA_ERROR(cudaMemcpy(b_cuda, b, sizeof(b), cudaMemcpyHostToDevice));
Step 2. Implement the Kernel
If you have written shaders before, you should have an intuitive understanding of what a kernel is. Otherwise, you can think of the kernel as a micro-program, which is so small that all it does is add one number to the other, then exit (at least in this scenario.)
__global__ void sum(int *a, int *b, int *c, unsigned int n)
{
    unsigned int i = blockIdx.y * gridDim.x + blockIdx.x;
    c[i] = a[i] + b[i];
}
Here’s the CPU implementation, in comparison:
void sum_cpu(int *a, int *b, int *c, unsigned int n)
{
    for (unsigned int i = 0; i < n; i++)
    {
        c[i] = a[i] + b[i];
    }
}
You will notice some unknown stuffs, for example blockIdx and gridDim. What are those?
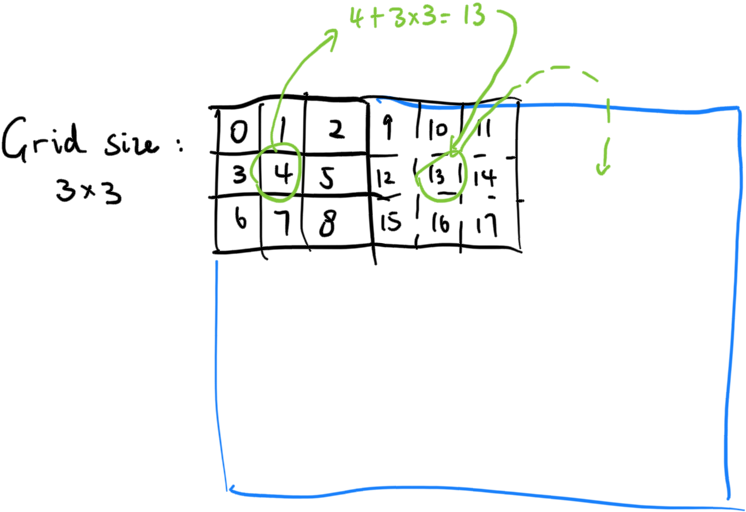
Step 3. Determine Kernel Size
In order to actually call the kernel, we have to first specify the grid size of the kernel. A grid is made up of blocks, like so:
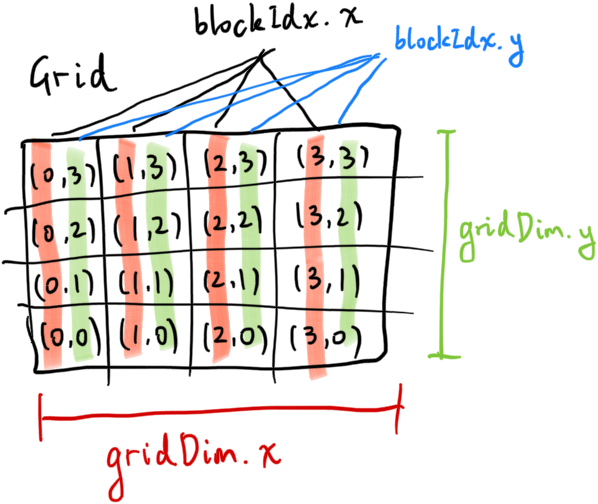
The array size in our example is 100. That means we can call the kernel with a grid size of 100x1, OR 50x2, OR 25x4, and so on. each CUDA block can resolve its real index by calculating blockIdx.y * gridDim.x + blockIdx.x listed above. Although we can totally use a grid size of 100x1 and drop blockIdx.y from the calculation completely, note that CUDA has an upward limit of grid dimensions So we are going to pretend that the array is very large (because it can and will be) and use a grid size of 25x4.
dim3 num_blocks(25, 4, 1);
Alternatively, we can evaluate the grid size on the fly.
int num_blocks_x = static_cast<int>(sqrt(N));
int num_blocks_y = (N + (num_blocks_x - 1)) / num_blocks_x;

dim3 num_blocks(num_blocks_x, num_blocks_y, 1);
Step 4. Call the Kernel
With the kernel size in hand, now we can call the kernel.
sum<<<num_blocks, 1>>>(a_cuda, b_cuda, c_cuda, N);
CHECK_CUDA_ERROR(cudaDeviceSynchronize());
If you were using the on-the-fly grid size calculation above, you will notice that we got lucky and the grid size is exactly 10x10. However in real life, array size can be weird. For example, with an array size of 102, this will lead to a grid size of 10x11, which in turn will lead to some blocks getting an out of bounds index during the kernel call. An index check can avoid this:
__global__ void sum(int *a, int *b, int *c, unsigned int n)
{
    unsigned int i = blockIdx.y * gridDim.x + blockIdx.x;
    if (i >= n)
    {
        return;
    }

    c[i] = a[i] + b[i];
}
Step 5: Copy the Data Back Into CPU
After the kernel call and assuming it went swimmingly, c_cuda should be filled with useful data. But we can’t just access it directly using c_cuda[i]; it must be copied back into the host first.
CHECK_CUDA_ERROR(cudaMemcpy(c, c_cuda, sizeof(c), cudaMemcpyDeviceToHost));
Don’t forget to free up the memory in device after they’re no longer needed.
CHECK_CUDA_ERROR(cudaFree(a_cuda));
CHECK_CUDA_ERROR(cudaFree(b_cuda));
CHECK_CUDA_ERROR(cudaFree(c_cuda));
And voilà! Now we have the result needed right in the variable c. A simple std::cout later and we’ll see that they are indeed the same:
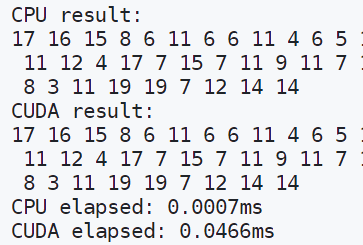
Wait a minute… Something doesn’t seem right. Why is the CUDA version taking significant more time than the CPU version?
That’s because during the first CUDA kernel call, the CUDA runtime has to initialize some stuffs, and they take time. Subsequent calls should be way faster (although they still can’t beat CPU because array size is still pretty small):
CPU elapsed: 0.0028ms
CUDA elapsed: 0.0303ms
CUDA elapsed 2: 0.0046ms
CUDA elapsed 3: 0.0036ms
However when the array size goes up, CUDA becomes an absolute beast. Let’s crank it up to 100,000,000!
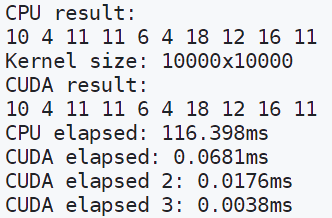
Even the slowest first CUDA call is a stunning 1900x+ speed improvement. The fastest can achieve a 30,000x+ speed improvement, which is crazy, and should be illegal. But that’s CUDA for you.
The Ultimate Kernel Formula
Although right now the kernel size formula can already handle a pretty large amount of data, in the future problems will still arise for incomprehensibly large datasets. Billions upon billions of entries which totally exceeds the maximum grid size:
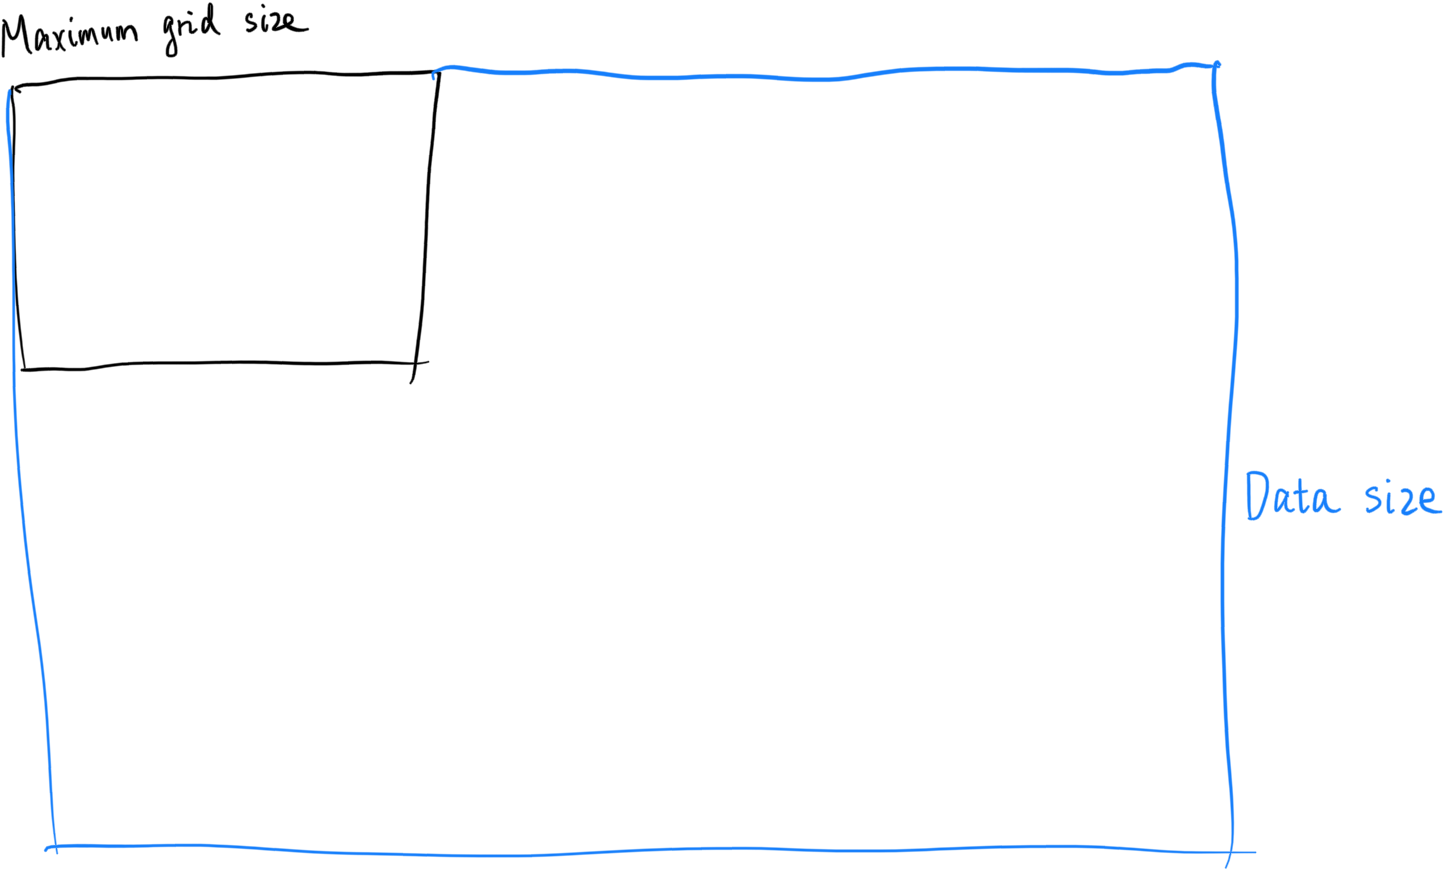
In that case, we shall bust out the ultimate kernel formula™. The core idea is simple - the grid size remains the same. However, after each CUDA block has finished processing the current entry, we advance the index by gridDim.x * gridDim.y, until the index becomes out of bounds:
__global__ void sum(int *a, int *b, int *c, unsigned int n)
{
    unsigned int i = blockIdx.y * gridDim.x + blockIdx.x;
    if (i >= n)
    {
        return;
    }

    while (i < n)
    {
        c[i] = a[i] + b[i];
        i += gridDim.x * gridDim.y;
    }
}
Now our little kernel can handle any arbitrary amount of data!
Threads
I have only so far covered blocks, but actually each block can also contain up to 1024 threads (32x32). Threads in the same block will be scheduled by the same multiprocessor, and therefore have the additional ability to synchronize. So if we are invoking the kernel using only 1 block, consisting of 10x10 threads, we can do this:
__global__ void sum_and_filter(int *a, int *b, int *c, int *d, unsigned int n)
{
    unsigned int i = threadIdx.y * blockDim.x + threadIdx.x;
    if (i >= n)
    {
        return;
    }

    while (i < n)
    {
        c[i] = a[i] + b[i];
        i += gridDim.x * gridDim.y;
    }

    __syncthreads();
    // Now all data in c has been evaluated, and therefore we can actually READ data from c!

    i = threadIdx.y * blockDim.x + threadIdx.x;
    while (i < n)
    {
        int prev = (i - 1) < 0 ? 0 : c[i - 1];
        int next = (i + 1) >= n ? 0 : c[i + 1];
        d[i] = (c[i] + prev + next) / 3;
        i += gridDim.x * gridDim.y;
    }
}
Read more about threads, blocks, and CUDA in general in the CUDA C++ Programming Guide. It’s free!
OpenGL Interoperability
CUDA has built-in OpenGL interoperability support, allowing CUDA to read/write OpenGL buffer objects (for example, a vertex buffer object) directly. This is done by creating a cudaGraphicsResource *, registering the OpenGL buffer object to that resource, and map the resource to a pointer.
#include <cuda_gl_interop.h>

// ...

cudaGraphicsResource *graphics_resource_vbo;
CHECK_CUDA_ERROR(cudaGraphicsGLRegisterBuffer(&graphics_resource_vbo, VBO, cudaGraphicsMapFlagsNone));

float *vbo_data;
size_t mapped_size;
CHECK_CUDA_ERROR(cudaGraphicsMapResources(1, &graphics_resource_vbo));
CHECK_CUDA_ERROR(cudaGraphicsResourceGetMappedPointer((void **) &vbo_data, &mapped_size, graphics_resource_vbo));
Now vbo_data contains the vertex data stored in that VBO. Note that we can’t access this in the CPU. We can however access and modify this directly in the GPU, which is very fast and convenient. Don’t forget to unmap once we’re done using it!
CHECK_CUDA_ERROR(cudaGraphicsUnmapResources(1, &graphics_resource_vbo));
Further Readings
Even though we have barely scratched the surface, but I guess that’s all for now. CUDA has way more to offer, for example fast texture fetches via cudaTextureObject_t, GPU random number generation via curand, and thrust, the CUDA C++ template library with vector and iterator support. One downside of CUDA is that once we are inside the kernel, no STL functions can ever be used. This is due to the fact that all device functions should have a __device__ prefix in front of the function. I guess it kind of makes sense, because using std::thread inside a kernel might be kind of janky and undefined. Fortunately, vector is already provided by the thrust library, and we won’t use it much anyway. Most of GLM actually supports CUDA, so that’s one less wheel to build for matrix multiplication. Eigen supports CUDA as well.
- CUDA by Example: An Introduction to General-Purpose GPU Programming: quite a good book to get started.
- CUDA C++ Programming Guide
- CUDA C++ Best Practices Guide
- CUDA for Engineers: An Introduction to High-Performance Parallel Computing: I have not read this book, but it’s on the CUDA book archive, so it must be pretty good.
Comments