Hey guys! Man, it’s been quite a while. But I am back! Lately, I’ve been playing around with WebAssembly again, and pondering about its possibility as a working frontend. And as it turns out, it works pretty well! I have made an image compression tool in the form of a WASM SPA. The source code is available on GitHub. Try it out online here!
I picked sokol_app and sokol_gfx for low-level graphics (it turns out I don’t need much), and of course, ImGui for the sweet, sweet immediate mode GUI. Using ImGui::TextWrapped for most of the things even makes the app kinda responsive (?), and that’s just so cool. The result? A fast, standalone batch image compression tool on the internet, while also being fully local. No image uploads needed. The whole thing is just a static web page, with a ~780K WASM binary. Follow me on this journey to discover the future of frontend development (?).
Why?
To start off, let me explain why I want to do this. And the reason is fairly simple: I always have kind of a distaste for Electron and browser-based apps. I don’t know where it stems from, it’s just there. VSCode, Discord, and almost all productivity apps that claims to be cross-platform, you name it. I think JS-backed apps are clunky and slow, there’s often this notable frame drop and they always make me uncomfortable. It also doesn’t help that I make like a ton of them.
Graphics apps, on the other hand, always feel very responsive (in the sense of when I click, something happens without delay) and fast. That feeling’s like a drug, and I am fully addicted to it. With WASM, graphics apps have the true potential of porting to every device on the planet, including embedded devices. So to test things out, I thought up a thing I may need to repeatedly use - batch image compression in my case, and tried to implement it, see where it goes.
Alright, that’s a very long rant. I know JS code can be fast, but this is largely just personal opinion. Anyway, I hope you now see why I think WASM apps are worth exploring. So, let’s begin!
Project Configuration
To kickstart the project, we will need a few libraries and tools. Emscripten is the first thing we need; we need emcc and em++ to create WASM binaries. Then, clone floooh/cimgui-sokol-starterkit and compile it to get started. I replaced CImGui to ImGui because I prefer the C++ version more, and sokol_imgui is capable of handling C++ ImGui anyway. If you disagree, you can just go on with CImGui, there really isn’t that much of a difference here.
# I added imgui to project root and changed up line 12 of the CMakeLists.txt in cimgui-sokol-starterkit:
add_library(imgui STATIC
    imgui/imgui.cpp
    imgui/imgui.h
    imgui/imgui_widgets.cpp
    imgui/imgui_draw.cpp
    imgui/imgui_tables.cpp
    imgui/imgui_demo.cpp)
target_include_directories(imgui INTERFACE imgui)
Then we need to switch up the sokol.cpp, as we will be including <imgui.h> now instead of <cimgui.h>. The same goes for the demo.c (which I renamed to main.cpp):
#include <imgui.h>
By also replacing the CImGui calls in main.cpp to ImGui calls, we should now be able to run the demo without any noticeable changes.
Interface Design
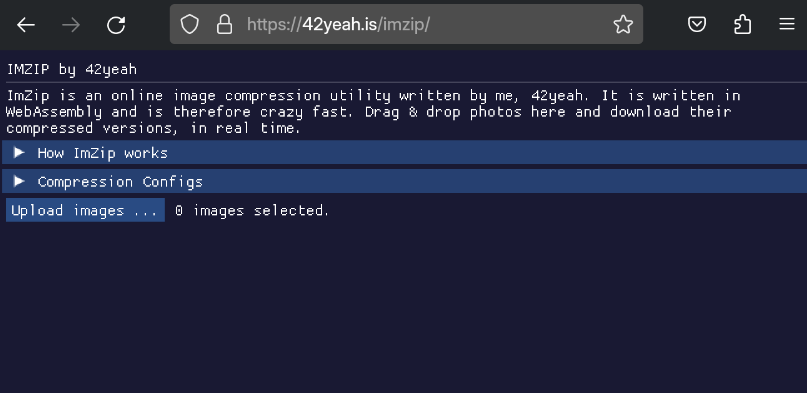
Next up, we need to design our interface. I want it to be website-like, so no ImGui windows (which we will fail later). The initial interface should also be clean, with a big button for image compression configs, and another big button to upload images. I have added a third big button to explain how the compression tool works and to shill myself.
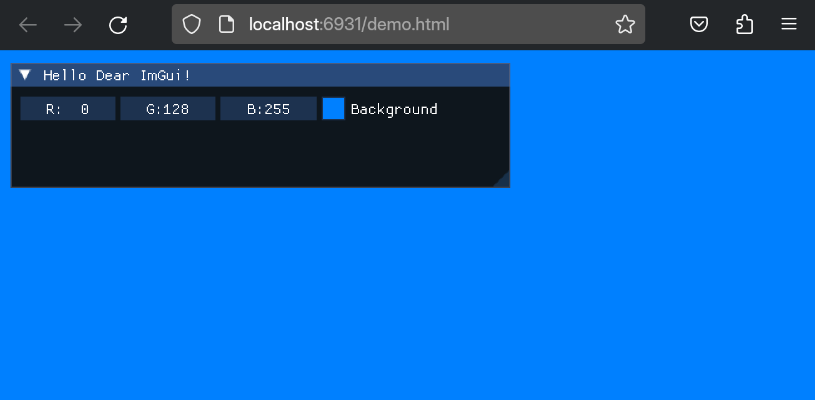
We are going to delete the demo background color selection window, and replace it with a windowless ImGui window:
if (ImGui::Begin("Windowless", nullptr, ImGuiWindowFlags_NoTitleBar | ImGuiWindowFlags_NoBackground |
    ImGuiWindowFlags_NoMove | ImGuiWindowFlags_NoResize | ImGuiWindowFlags_NoBringToFrontOnFocus))
{
    ImGui::TextWrapped("IMZIP by 42yeah");
    ImGui::Separator();
    ImGui::TextWrapped("<INTRODUCTION>");

    if (ImGui::CollapsingHeader("How ImZip works"))
    {
        // ... UI elements explaining how it works
    }
    if (ImGui::CollapsingHeader("Compression Configs"))
    {
        // Compression configurations
    }

    if (ImGui::Button("Upload images ..."))
    {
        // Handle image uploads...
    }
    ImGui::SameLine(); ImGui::TextWrapped("%d images selected.", 0);
    // <GALLERY CODE>
}
After user has uploaded images to the WASM MEMFS, aka the in-memory filesystem, we want to display a little gallery as well, so that the user can see what they have uploaded, and then they can also manipulate the images. But that comes later. So far, UI-defining code is probably done - so let’s fill them with logic.
The most defining feature of an image compression tool needs to have these three (3) core features:
- The app should have the ability to receive images;
- The images should be viewable in-app;
- The app should be able to compress them;
- The compressed image should be downloadable.
Let’s go over them one by one.
Handling Image Uploads
So the very first thing we need to do is to handle image uploads. When the user clicks on the “Upload images …“ button, a file dialog should appear. Normally, we would use ImGuiFileDialog, but as WASM runtime is a sandboxed environment with no knowledge of the host machine (the MEMFS is in-memory), we can’t really do that. And instead, we have to resort to good ol’ HTML + JavaScript (OH NO!). A file input needs to be added in the shell file shell.html:
<input id="file-input" type="file" multiple onchange="upload()" accept="image/png, image/jpeg">
And when user clicks on the upload button, we can just simulate a click event, using EM_ASM:
if (ImGui::Button("Upload images ..."))
{
    EM_ASM(
        document.querySelector("#file-input").click();
    );
}
As we’ll see down the road, this method has a major pitfall, but it’ll have to do for now.
When the input changes, it calls the upload() function, which somehow needs to tell our WASM module the files are ready. But before all that, we need the full file in MEMFS, or the WASM module won’t be able to load it. And to do that, we need to first load the file using a FileReader, then write it into memory using the Emscripten Filesystem API Module.FS. We need to update CMakeLists.txt to export the filesystem APIs:
# I don't know if WASMFS works here but the documentation says it's better
# Relevant GitHub issue: https://github.com/emscripten-core/emscripten/issues/6061
target_link_options(imzip PRIVATE -sWASMFS -sFORCE_FILESYSTEM -sEXPORTED_RUNTIME_METHODS=['FS'] -sALLOW_MEMORY_GROWTH)
Loading the images in WASM tend to take up a lot of memory, and can easily overflow the 16M default limit, so we need -sALLOW_MEMORY_GROWTH. The upload function is listed below, which writes the list of images into the root directory of the MEMFS.
const files = document.querySelector("#file-input");

function upload() {
    let doneFiles = 0;

    for (let i = 0; i < files.files.length; i++) {
        const reader = new FileReader();

        function fileLoaded(e) {
            // TODO: catch errors
            const buffer = new Uint8Array(reader.result);
            Module.FS.writeFile("/" + files.files[i].name, buffer);
            console.log("File written: ", files.files[i].name);
            doneFiles++;
            if (doneFiles == files.files.length) {
                uploadDone();
            }
        }

        reader.addEventListener("loadend", fileLoaded);
        reader.readAsArrayBuffer(files.files[i]);
    }
}
uploadDone will be called once all files have been uploaded. In uploadDone, we need to figure out how to pass the list of images to our WASM module, which is actually not a trivial task. We have two available options:
- The cool option: somehow pass an array of strings to WASM.
- The wimp option: write the file list into a file and tell WASM to read that file.
I have opted to go for the wimp option (NOOOO!). The file list is written to /info.txt and our WASM module is notified (Module._images_selected) to check out that file.
function uploadDone() {
    let fileInfo = "";
    for (let i = 0; i < files.files.length; i++) {
        fileInfo += "/" + files.files[i].name + "\n";
    }
    Module.FS.unlink("/info.txt"); // We don't care about the unlink result
    Module.FS.writeFile("/info.txt", fileInfo);

    Module._images_selected();
}
Though I have not read through these articles, it’s worth checking out if you want the cool option:
- How to pass a string to C code compiled with emscripten for WebAssembly
- Passing arrays and objects from JavaScript to c++ in Web Assembly
- WASM – Pass Array Between C++ And JS (man, this one has a lot of ads.)
Back to our WASM C++ code, we need to define and implement the images_selected function. It should be wrapped in an extern "C" block to avoid name mangling.
static struct
{
    sg_pass_action pass_action;

    // update the state to add the following:
    std::vector<std::string> files;
    std::vector<std::shared_ptr<Image> > images;
} state;


extern "C"
{
    // https://stackoverflow.com/questions/61496876/how-can-i-load-a-file-from-a-html-input-into-emscriptens-memfs-file-system
    void images_selected()
    {
        std::ifstream reader("info.txt");
        if (!reader.good())
        {
            std::cerr << "Bad reader: info.txt?" << std::endl;
            return;
        }
        std::string path;
        while (std::getline(reader, path))
        {
            state.files.push_back(path);
            std::shared_ptr<Image> img(new Image());
            if (!img->load(path))
            {
                // TODO: a better error
                std::cerr << "Cannot load: " << path << "?" << std::endl;
            }
            std::cout << "Image loaded: " << img->w << ", " << img->h << std::endl;
            state.images.push_back(img);
        }
    }
}
The Image here is a simple image wrapper class. It keeps track of some of the metadata of the image (width, height, and file name), and the image itself, in the form of an std::unique_ptr. The image is loaded via stb_image. If you are curious about its implementation, the source code is available on GitHub.
Finally, we update the image number indicator so that it correctly reflects how many images have been chosen so far:
ImGui::SameLine(); ImGui::TextWrapped("%d images selected.", (int) state.files.size());
Time to test it out! Click on the “Upload images …“ button, and a file dialog should popup. Choose as many as you want, and the following things will happen in order:
- Chosen images are read by a
FileReader. - The images are written into MEMFS using
Module.FS.writeFile. - List of images are written into
/info.txt. - WASM module loads the list of images.
- WASM module loads each image individually using stb_image.
If you are perceptive, you will notice the image has been copied, multiple times, during the image loading procedure. That’s very unfortunate, and I have not figured out a way to reduce the number of copies so far. In fact, an extra copy will be created when we compress the image. Perhaps straight up passing the Uint8Array into WASM module is better, but it is what it is.
Moving on, here’s what we see when we choose 5 images to upload:

Viewing Images
Now that we have all these images, it’s time to make a little viewer. Sokol provides API for sokol texture-ImGui interoperation. We first create a sokol image (sg_image):
sg_image_desc desc = {
    .width = w,
    .height = h,
    .pixel_format = SG_PIXELFORMAT_RGBA8, // Hmm...
    .sample_count = 1,
};
desc.data.subimage[0][0] = {
    .ptr = image.get(),
    .size = (size_t) (w * h * ch)
};
sg_image = sg_make_image(&desc);
Then create an simgui_image_t based on the sg_image:
sg_sampler_desc sam_desc = {
    .min_filter = SG_FILTER_LINEAR,
    .mag_filter = SG_FILTER_LINEAR,
    .wrap_u = SG_WRAP_REPEAT,
    .wrap_v = SG_WRAP_REPEAT
};

simgui_image_desc_t imgui_desc = {
    .image = sg_image,
    .sampler = sg_make_sampler(&sam_desc)
};
imgui_image = simgui_make_image(&imgui_desc);
The imgui_images can be rendered by ImGui using:
ImGui::Image(simgui_imtextureid(imgui_image), { w, h }, { 0.0f, 0.0f }, { 1.0f, 1.0f });
We create an simgui_image_t for each uploaded image. After some formatting, we have made a little gallery:
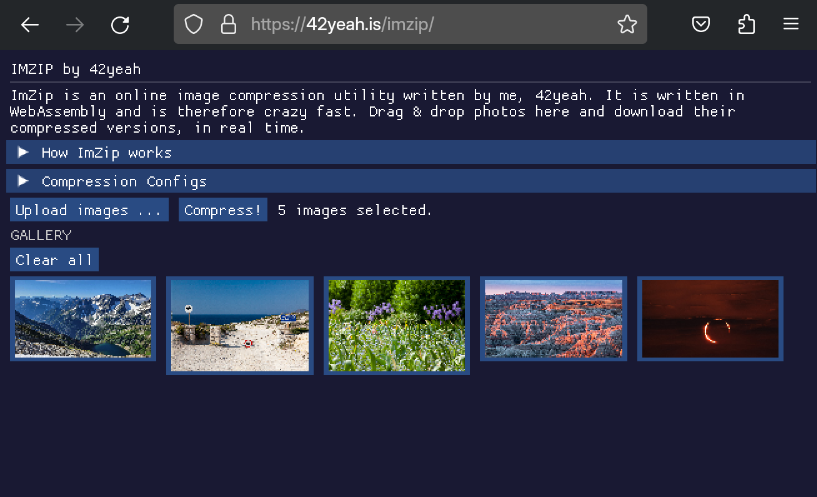
I have gone one step further and make the images clickable by turning them into image buttons. A little preview window pops up when the user clicks on any of the images, and the user can choose to download only this one compressed image, or remove it from the gallery.
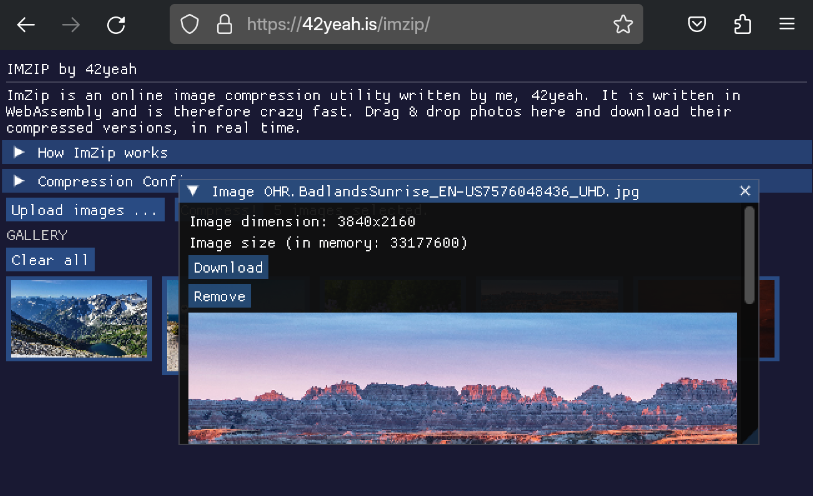
Those are mostly ImGui UI codes, so I won’t be putting them here. Check out the GitHub repo for more detail.
Image Compression
The app has two compression methods: compress one image and compress all images. Though you may say that they are exactly the same, and maybe they are, the difference lies in the fact that when multiple images are being compressed, we don’t want to spam the browser download window, and as a result, must compress the compressed images into a single archive before proceeding to download.
ImZip compresses the images by doing the following:
- If the image size is larger than a certain threshold (2K by default), we resize the image by half using stb_image_resize
- Re-encode the image in JPEG with a certain quality (using stb_image_write)
We want these parameters to be configurable as well, so we add them to the state.
static struct
{
    sg_pass_action pass_action;
    ImVec2 fold_size;
    int quality;

    std::vector<std::string> files;
    std::vector<std::shared_ptr<Image> > images;
    std::vector<ImageInfo> image_windows; // this is for the windows pop-up mentioned above
} state;
Also, I just found out (as of the time of writing this blog post), that stb_image_resize.h has been deprecated. If you are trying to implement, it is recommended that you use stb_image_resize2.h.
Compress One Image
We first dicuss how to compress one image. This happens when the user clicks on the “Download” button in the preview popup window. Single image compression is very straightforward; we just need to implement the two steps above, write the result JPEG to MEMFS, and tell the browser to download it. So let’s do it!
void compress_one_image(const std::shared_ptr<Image> &im)
{
    Image im_copy(*im);
    bool failed = false;
    while (im_copy.w >= state.fold_size.x && im_copy.h >= state.fold_size.y)
    {
        if (!im_copy.resize(im_copy.w / 2, im_copy.h / 2))
        {
            failed = true;
            break;
        }
    }
    if (failed)
    {
        return;
    }

    std::string path = "/";
    path += im_copy.file_name + "_cmpr.jpg";
    im_copy.save_compressed(path, state.quality);
    download(path.c_str());
}
Again, the code is very straightforward. The only problem here is the download function, which needs to tell the browser to download a specific file stored in MEMFS. This unfortunately would require JavaScript again, as WASM has no direct way to achieve that. Luckily, it is not that complex:
- Read the file from MEMFS using
Module.FS.readFile. - Create a blob based on the data.
- Export a URL from the blob.
- Set the
hrefof a<a>element to the blob URL. - Fake-click on the hyperlink to start download.
EM_JS(void, download, (const char *path), {
    const pathStr = UTF8ToString(path).replace("/", "");
    const data = window.Module["FS"].readFile("/" + pathStr);
    const blob = new Blob([data]);
    const url = window.URL.createObjectURL(blob);
    const downloadEl = document.querySelector("#download");
    downloadEl.download = pathStr;
    downloadEl.href = url;
    downloadEl.click();
});
We use the EM_JS macro to declare our download function like a C function. Our const char * string can be passed directly into JS code, so that’s extra cool. Take a look at the compression result:
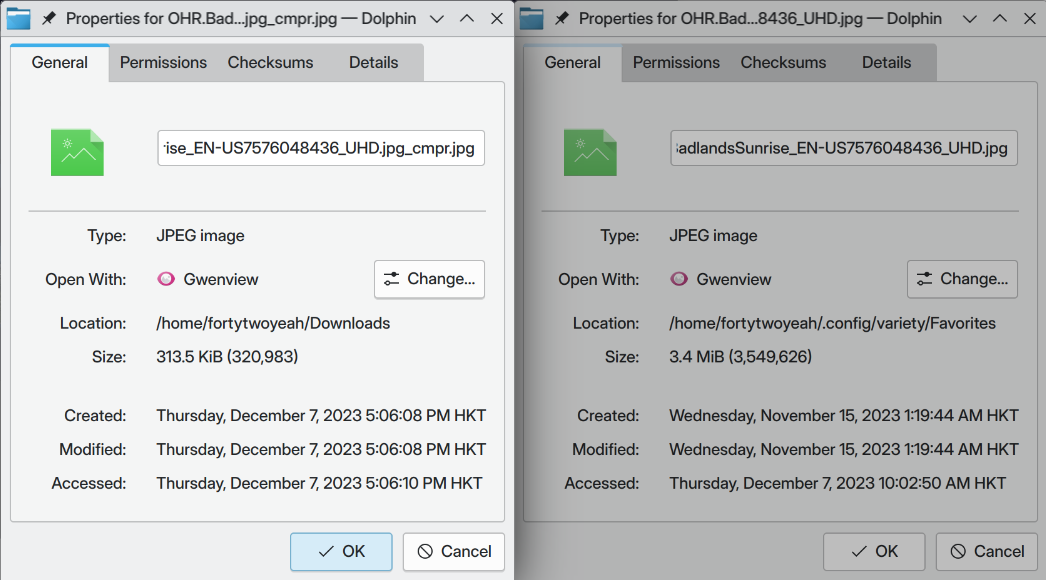
That’s a 90.9% size reduction! Man, the stb libraries are just out of the world.
Compress Multiple Images
The compression procedure is basically the same for multiple images, but now we need to make them into one archive to prevent spamming the download window. To that end, I chose to go with miniz, a “lossless, high performance data compession library in a single source file”. To also prevent littering MEMFS with compressed images, this time we will compress it in memory, and then add them, one by one, to an archive stored in MEMFS. The only difference here for image compression is we need to change from stbi_write_jpg to stbi_write_jpg_to_func.
But what func? Maybe your initial thought is to write it into like, a std::stringstream or something. But that’s not good enough. When we need to extract the buffer from a stringstream, we need to do a ss.str(), which creates, you guessed it, another copy of the image. To counter that, we need to implement our very simple streaming structure:
struct CompressedInfo
{
    std::string file_name;
    char *buf;
    int buf_size;
    int ptr;

    CompressedInfo();
    ~CompressedInfo();

    void write(const char *what, int n);
};
The CompressedInfo struct is a simple char string with dynamically allocated memory. The buf_size starts at 1024 and expands twice everytime it fills up.
// DEFAULT_BUF_SIZE = 1024
CompressedInfo::CompressedInfo() : file_name(""), buf(nullptr), buf_size(0), ptr(0)
{
    buf = new char[DEFAULT_BUF_SIZE];
    buf_size = DEFAULT_BUF_SIZE;
    ptr = 0;
}

void CompressedInfo::write(const char *what, int n)
{
    if (n + ptr > buf_size)
    {
        buf_size *= 2;
        char *new_buf = new char[buf_size];
        memcpy(new_buf, buf, ptr);
        delete buf;
        buf = new_buf;
    }
    memcpy(&buf[ptr], what, n);
    ptr += n;
}
Since we can directly access the underlying buf pointer here, hurray! No copies created. Well, one copy created, because we need to copy the image for resizing and whatnot.
Next we need to put the image into said archive. The example2 of miniz is a good reference, and I have implemented my code based on that.
void compress_all_images()
{
    // 1. Compress all images and put them into a vector
    std::vector<std::shared_ptr<CompressedInfo> > infos;
    for (int i = 0; i < state.images.size(); i++)
    {
        Image im(*state.images[i]);
        // ... compress the image

        std::shared_ptr<CompressedInfo> cpr = im.save_compressed_memory(state.quality);
        if (cpr->ptr == 0)
        {
            continue;
        }
        infos.push_back(cpr);
    }

    // 2. Prepare the ZIP file
    mz_bool status = MZ_TRUE;
    mz_zip_error err;

    // 3. Delete it if it exists
    remove(state.archive_name);
    char archive_path[1024], sprinted[1024];
    // 3.5. Append a slash in front of the archive name
    sprintf(archive_path, "/%s", state.archive_name);

    // 4. Iterate through all compressed images
    for (int i = 0; i < infos.size(); i++)
    {
        sprintf(sprinted, "%s_cmpr.jpg", infos[i]->file_name.c_str());

        // 4.1. Add them to the archive
        status = mz_zip_add_mem_to_archive_file_in_place_v2(archive_path, sprinted,
                                                            infos[i]->buf, infos[i]->ptr,
                                                            nullptr, 0, MZ_BEST_COMPRESSION, &err);

        if (status == MZ_FALSE)
        {
            std::cerr << "Cannot compress? " << mz_zip_get_error_string(err) << std::endl;
            break;
        }
    }

    if (status == MZ_FALSE)
    {
        return;
    }

    // 5. Tell the browser to download it
    download(archive_path);
}
And look at that! All done within a jiffy. Here’s the downloaded archive content:
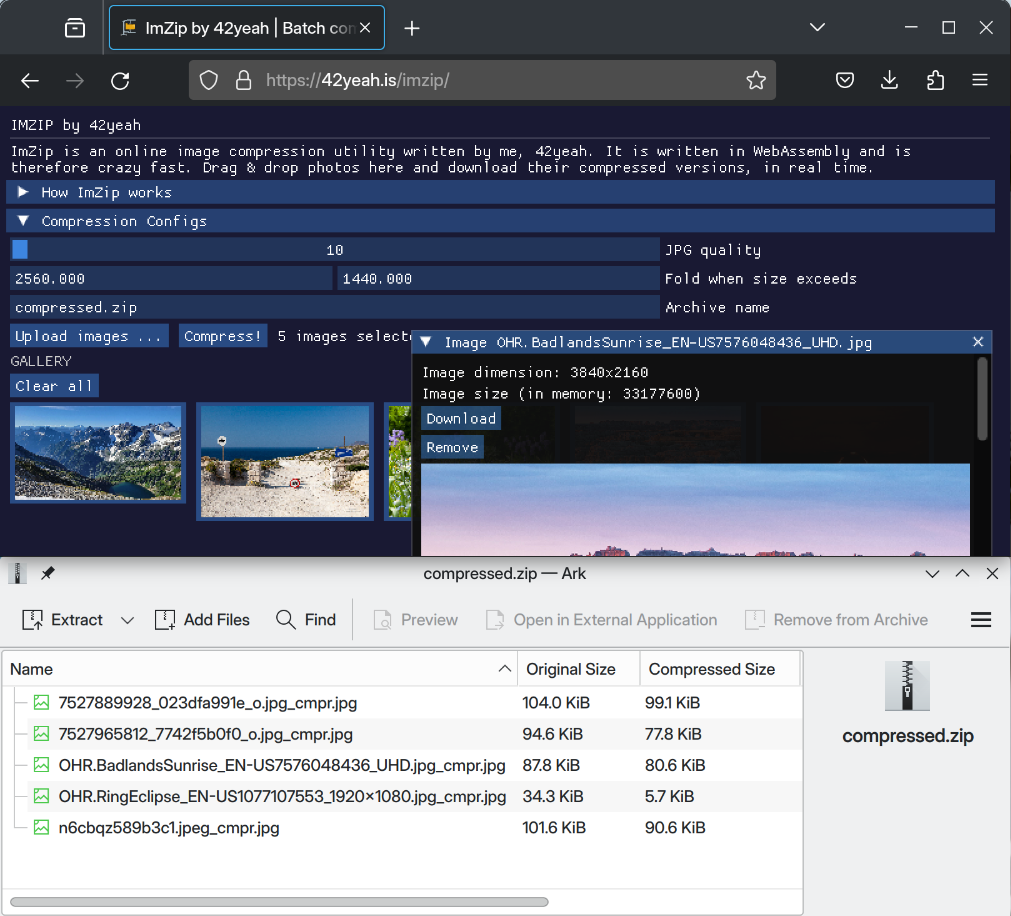
In comparison, the original 5 images have a total size of 9.7M. And that’s it! An image compression tool written completely in WASM C++, except a few places where you can’t. But most of them are! Yay! And they live happily ever after. The end.
iOS and Safari
Of course. Of course Safari doesn’t like what’s happening. Remember the file upload dialog? When I was testing the tool, both iOS Safari and iPadOS Safari fails to produce that when the upload button is pressed. Some search later and I found out that for an input click event to be triggerable from JS code, the input must not be hidden. BUT! other than that, during my extensive testing, I have found out another, hidden requirement:
The
input.click()must be called in some sort ofonclickcallback function, and it must be in response to an explicit user click (not from JS).
During my tests, when I click on a button that calls input.click(), the file selector will appear; but if I give it a delay, say wrap it in a setTimeout, it will just never appear. I think Safari has some weird requirements here which requires the real user click event to be propagated down the stack for the file input click event to be active. And that’s very, very annoying because we have no way to do that as the user click is captured by the canvas and somehow propagated into our ImGui button. The context may already be long lost, but I am not sure about the core issue here. Nevertheless, I have thought up two solutions:
- The cool option: directly handle the
canvas.onclickand compare the cursor click location to the button location by performing a bounding box check - The wimp option: detect if the browser is Safari. Add an HTML overlay on top of the webpage when the button is clicked, and tell user to click the HTML button again so that the dialog can appear
Guess which route I took? Yeeaaah…
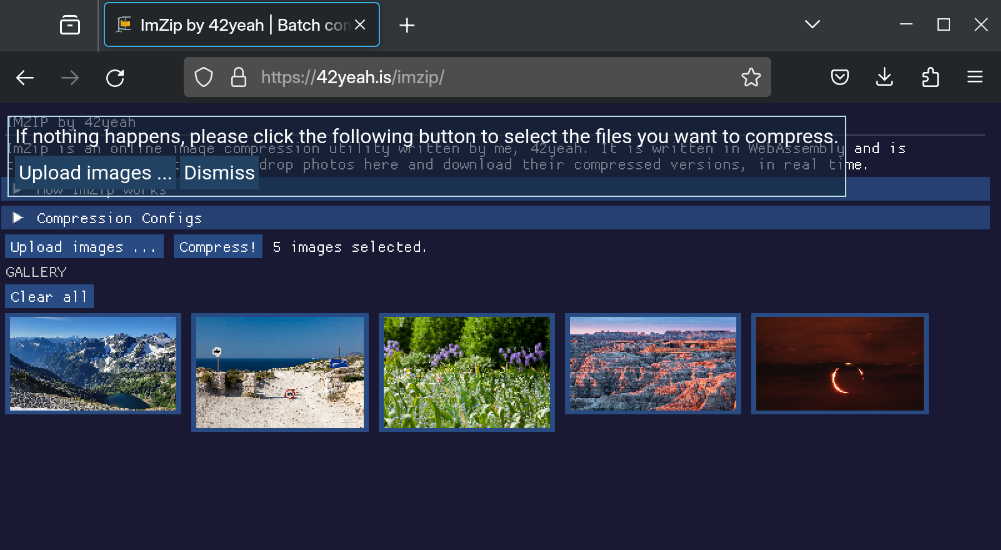
This in my opinion, is a critical flaw, as our WASM app is now no longer a pure WASM app. Well, it wasn’t that pure to begin with, but the file upload input and the hyperlink can hide safely under our canvas facade. With this abrupt popup? Not anymore. But again, it is what it is. Hopefully one day Safari can do something about it.
The popup itself is simple enough. Just a <div> with position: absolute.
<div class="hidden heck-safari">
    <div class="prompt">
        If nothing happens, please click the following button to select the files you want to compress.
    </div>
    <div class="button" onclick="document.querySelector('#file-input').click()">Upload images ...</div>
    <div class="button" onclick="document.querySelector('.heck-safari').classList.add('hidden')">Dismiss</div>
</div>
In our WASM module, we do an extra check in the upload button:
if (ImGui::Button("Upload images ..."))
{
    EM_ASM(
        if (navigator.userAgent.indexOf("iPhone OS") != -1 ||
            (navigator.userAgent.indexOf("Intel Mac OS X") != -1) && navigator.userAgent.indexOf("Chrome") == -1) {
            document.querySelector(".heck-safari").classList.remove("hidden");
        }
        document.querySelector("#file-input").click();
    );
}
And that’s it! And now they lived kinda-happily ever after.
Conclusion
That’s it for now. Although we still have to resort to good ol’ JavaScript at places, most of the work can be done in WASM. My one wish is that in the future, Emscripten can have some new API for direct DOM manipulation. There are some other optimizations that I haven’t mentioned, for example only redrawing when events happen, to prevent continuous high CPU usage. When static, our application takes as much CPU as the next static webpage.
Though not 100% the satisfactory full WASM implementation like we wanted, this is still a wonderful journey, combining lots of libraries and technologies. It’s quite fun making a small project like this from time to time. I have also made the webpage title very click-baity, so let’s see if people Googling tools like this will actually use it. Well, until next time. Toodles!
References
- Sokol: minimal cross-platform standalone C headers, GitHub
- How do I export FS in js file?, GitHub
- Emscripten Filesystem API
- How can I load a file from a HTML input into Emscripten’s MEMFS file system?, StackOverflow
- Emscripten: Interacting with code
- Passing arrays and objects from JavaScript to c++ in Web Assembly, StackOverflow
- Sokol example: imgui-images-sapp.c, GitHub
- Sokol example: loadpng-sapp.c, GitHub
- miniz: Single C source file zlib-replacement library, GitHub
- miniz example2.c, GitHub
- calling click event of input doesn’t work in Safari, StackOverflow
Comments